Showing posts with label team xecuter sx os. Show all posts

Tuesday, January 7, 2020

[Switch] Team Xecuter presents its Switch Lite compatible SX OS 3.0 video

What was only rumors is now officially confirmed by Team Xecuter in a short demonstration video.

SX OS 3.0 comes for Nintendo Switch Lite

Who says New Year is over? History of accompanying the joy and good humor that bring the holiday season, Team Xecuter published a few days ago on its blog wishing good holidays to its users.

But the latter was accompanied by a short video announcing one of the things promised by the team of developers for the year 2020, namely the compatibility of SX OS with recent Nintendo Switch models (including Switch Lite).

Confirmed! Team Xecuter SX Product will hack Nintendo Switch Lite

As a reminder, the hack on Nintendo Switch since April 2018 until now uses a flaw in the Tegra processor of NVIDIA (see on this subject our file "Review of the last events of the hack scene"). The vulnerability being hardware and not software, Nintendo hastened to correct the new models of its Switch by replacing the processor in question. This is why the latest models from May or June 2018, including the Switch Lite model available since September 2019, can no longer be hacked in the same way.

However, 2 months ago, serious rumors began to run about the fact that Team Xecuter had found a way to install its Custom Firmware SX OS on these famous recent copies of Switch.

Today, the team has therefore just officially confirmed that it was working on it and that it was preparing an exit for the beginning of 2020, as well as providing tangible video proof of compatibility with the most recent model which either, namely the Nintendo Switch Lite.

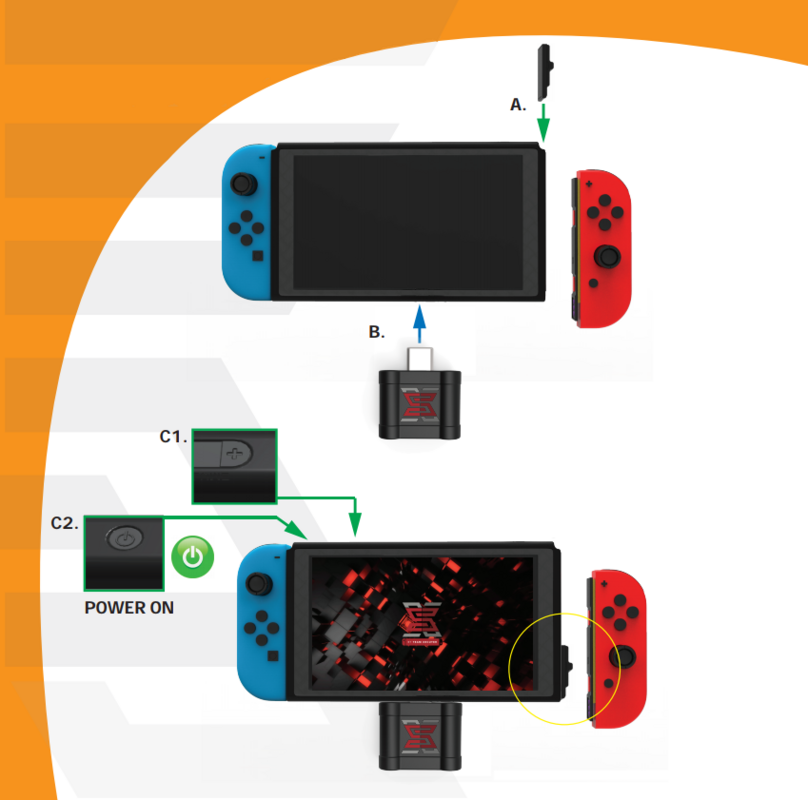
  • The firmware (FW) in English, or firmware in French, is a software layer developed and integrated within a computer device (here the Nintendo Switch) by the manufacturer (Nintendo). Its main function is to provide communication between the OS (the operating system, for example Windows or MacOS for computers) and the hardware (hardware in English) to ensure its proper functioning.
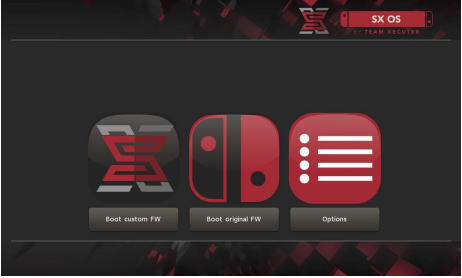
  • Custom Firmware (CFW) is an official firmware that has been modified by third-party developers (not working for Nintendo). It allows the user to take advantage of the features offered by the official firmware, as well as additional options added by the developer (s).

When will SX OS 3.0 release?

Not sure the detailed date, at the end of Team Xecuter announcement, we saw the site mentioned the new products will be released on the early of 2020, the specific time still not clear now.
That said, there are still a few unanswered questions. We do not know if, as ub3r1337 (editor with our colleagues at MaxConsole) said, this SX OS - which should come in the form of a small device to insert into its Switch - will be well divided into two different types : one for the classic Switch models (original, patched and mariko) which should appear first, and the other for the Switch Lite which should be on sale later.

Finally, we have no idea either of the price that may cost the small device for this new version of the SX OS.

In short, we will continue to closely monitor Team Xecuter announcements on this subject to inform you as soon as possible. 🙂 Happy New Year everyone!

Tuesday, December 31, 2019

Team Xecuter manages to bring its custom firmware to Nintendo Switch Lite

Team-Xecuter has shown off the new Nintendo Switch Lite running custom software through the use of a modding chip. It's now official and proven with a video showing SX OS CFW on a Switch Lite.

SX OS 3.0.0 work on Nintendo Switch Lite

It has been said for weeks that Team-Xecuter has found a way to bring its custom SX OS firmware to Nintendo Switch Lite, a console model that due to its hardware-level features and changes was believed to be invulnerable. Today the rumors are over and the official confirmation is given: Team-Xecuter has never said ever to get to install the custom SX OS firmware on a Nintendo Switch Lite.

To demonstrate its feat, Team Xecuter has published a video where we can see a Nintendo Switch Lite starting with version 3.0.0 of the SX OS, which is not yet publicly available. The console loads without problem with the custom firmware and starts the game Sushi Striker: The Way of Sushido. How have they achieved it? We still don't know that and no further details will be offered until early 2020.


Review of SX OS Working on Nintendo Switch Lite

In the scene, and more when looking for an economic benefit such as Team Xecuter, discretion is indispensable. However, the possibility of a hardware mod that could be installed without the need for welding has been discussed previously, although it would be recommended to do so to avoid reliability problems. In any case, it would be a simple job. It is also pointed out that Team Xecuter would have two devices, one for the original Nintendo Switch model (including Mariko) and another for Nintendo Switch Lite.

Team Xecuter may not be to everyone's liking, but in the Nintendo Switch scene it shows that right now they are one step ahead of the rest. Getting to install a custom firmware on Nintendo Switch Lite is an achievement. The console integrates the Joy-Con in its structure making entry into Recovery Mode (RCM) more difficult, and like the new Nintendo Switch model (Mariko) its hardware has been factory modified to cover the security problems it had The original console.

We will have to wait a bit to have more information. However, today it can be confirmed that Team Xecuter has made Nintendo Switch Lite a vulnerable console. We will see if over time the Atmosphère team, an open source custom firmware, achieves the same progress. They have it difficult if the solution is through hardware, but it is possible that the Team Xecuter method also serves to install Atmosphère or any other custom firmware.

When will it be released?

Team Xecuter still not give us the detailed date, but they said it will be released in early 2020, but it is not exact news, who knows when they will change the specific time. Follow Flashcarda.ocm, We will continue to pay attention to the specific release time and product details。

Friday, August 9, 2019

SX Pro can not work? How to solve it?

SX Pro black screen, how to solve? donwload everything well, but sx pro dongle still can not work, what should I do? Here we collect many sx pro and sx os problems and solutions, hope this can help you.

Why isn't my TX SX Pro Dongle Working?


Firstly, you need to follow THIS GUIDE to be sure your switch is "hackable"
Once you determine it is - then proceed.

There are a few reasons why the TX SX Pro dongle doesn't work as you expected.
If you are having trouble please follow these steps.

1.

  • Make sure your TX SX Pro dongle has a charge.
  • The recommended way to charge the dongle is to ONLY use the supplied micro USB cable and plug into a USB port on your PC.
  • The dongle only takes 5-10 seconds to charge.
  • The LED light on the Pro dongle should light up Green.

  • If the LED light does not turn green quickly unplug and replug the usb cable from the PC and wait 5-10 seconds.
  • If the LED is still not lit up, then your pro dongle may be defective. Contact your reseller with questions.


2


Use a freshly formatted Micro SD card and place a new copy of boot.dat onto the root of the card.

If you already have an activated license, you can copy license.dat to the card as well.


3


Next you need to make sure your switch is turned COMPLETELY OFF. If you have enabled AutoRCM in the past, it may be difficult to know if your switch is off.

The easiest way is to push the power button one time. Then wait for 10 seconds, then PRESS AND HOLD POWER FOR 15 SECONDS

Your Switch should be completely turned off now.

 Insert the jig and the Pro Dongle into the switch

Hold the Vol+ button down and Press the Power button


You should be greeted with the SX OS BootLoader Screen


4


When this screen shows up, this means your Pro Dongle is working fine. If not, then proceed to Step 5.

If you had issues booting up your switch previously, it could be that AutoRCM is enabled.

When AutoRCM is enabled YOU MUST HAVE THE PRO DONGLE INSERTED EVERY TIME YOU TURN YOUR SWITCH ON! (You could also send payloads from an external source such as PC, cell phone, etc...)

Touch the Options button.

If you wish to disable AutoRCM, then tap the Uninstall AutoRCM button. This way, your switch will boot to the stock OS every time, UNLESS you insert the jig and dongle and hold vol+ when you power up

5


If your switch is not booting, then this could mean one of two things.

1. The battery is dead in your Nintendo Switch.

2. The Pro dongle is not working

Again, we need to BE SURE your switch is powered COMPLETELY OFF
Remove the jig and Pro Dongle

push the power button one time. Then wait for 10 seconds, then PRESS AND HOLD POWER FOR 15 SECONDS

Now plug in the charging cable that came with your Switch and leave it on the charger for 1 hour.

After 1 hour has passed, go back to step 3 and try again. If you have returned here again, read on to step #6

6


Due to the possibility of a completely dead Switch battery, the next test would be to try this Pro dongle on a different Nintendo Switch.

There is no need to boot completely into SX OS, all you would need to do is get to the BootLoader Menu to confirm the dongle is working.

If you absolutely can NOT get the Pro dongle to work, then you will need to contact your reseller with any questions you may have about warranty.

If you are stuck at a black screen instead of seeing the BootLoader, then try sending THIS PAYLOAD using:

[Windows] TegraRcmSmash
 
[Android] SX Tools
 
[Linux] fusee-launcher

This guide will likely change as other tests and solutions are brought to my attention.
There are some issues with folks who have enabled autorcm and have left their switch in RCM mode so long it completely drains the battery.

Battery issues should be addressed in a different theard.

Tuesday, July 2, 2019

【Guide】How to migrate from SX OS to Atmosphere?

This short guide will show the basic steps to move from SX OS to Atmosphere, or have them both next to each other. It's very straightforward and should be done in maybe ten to fifteen minutes.


Why would I want to switch to Atmosphere and what are the ups and downs?

Pros:
  • Most up-to-date CFW support for newer Firmwares
  • KIP Support (external modules, 'add-ons' if you want)
Cons:
  • No XCI Loading
  • No Emunand
  • No USB Loading
  • No installing games from USB media
To put it in other words: if you don't need or want
  • Emunand
  • XCI Loading
  • USB HDD support,
then there are no sensible reasons to hold on to SX OS.


General Warning for SX OS users!


This guide will not cover anything Emunand-related nor provide support for something SX OS-specific that you did set up on SX and now won't work anymore on Atmosphere. Assuming you have an Emunand running, you have to get rid of that before migrating to Atmosphere for the obvious reason that Atmosphere does not run Emunand (yet). You'll have to figure that out yourself though.

Basic Atmosphere Setup for existing SX OS users

  • Get the latest Atmosphere files (zip and fusee-primary.bin), put the contents of the zip on the root of your MicroSD
  • Get Sigpatches if needed (to run unsigned code), put the contents of the zip on the root of your MicroSD
  • SX Installer does not work on Atmosphere, so get another title installer like Goldleaf, Tinfoil or Lithium and put it into your \Switch folder
  • Since 0.8.5, Atmosphere supports cheats as well and they are compatible with the format that SX uses. User KuranKu already described what you need to move to make it happen, so have a look at this guide if you need this
  • If you have any XCI files left, you will either have to install them with the latest versions of Tinfoil or Lithium or grab them again as NSPs from your most favourite source. Don't install them via the SX menu, they won't work on Atmosphere
  • If you don't have or use the SX dongle, just use whatever loader you were using before but instead of pushing the SX payload, push the Atmosphere fusee-primary.bin payload

That is basically it. Now when in Atmosphere, launching any app while holding R (standard config) will open the Homebrew menu and allow you to run Homebrew from there.

All of the below is not necessary if you use any other dongle or payload launcher besides the SX Dongles! If you have a different method of launching payloads, just push the payload of your choice to go into SX or Atmosphere!


Booting Atmosphere with the SX Pro or Gear Dongle


If you want to use your existing SX Dongle to boot Atmosphere or to have a choice between Atmosphere and SX OS, there are some additional steps needed. SX actively blocks loading fusee-primary.bin through their launcher (boot.dat) since SX OS 2.6, so you need to install a little workaround and that is Hekate. I will show you how to set this up properly for both options - either having the dongle boot Atmosphere automatically, or leaving you a choice between Atmosphere and SX OS.


Setting up Hekate

For both options, we need Hekate.

You can optionally set Hekate up as the Payload that the Reboot to Payload Homebrew boots into. Now when you use this Homebrew or your console crashes, the console will boot into Hekate, allowing you to dump your NAND, choose between SX OS and Atmosphere (if wished) etc.

  • Get the latest Hekate files and put the contents of the zip on the root of your MicroSD
  • Rename hekate_ctcaer_*.bin on the root of your MicroSD to payload.bin
  • Optional (if you want to have your console reboot into Hekate): Make a copy of the hekate_ctcaer_*.bin Payload, rename it to reboot_payload.bin and put it into the \atmosphere folder, overwriting the existing one. If you use the Reboot to Payload Homebrew, it'll now go into Hekate
  • Optional (if you want to continue using SX): Get the SX OS Payload, put it into \bootloader\payloads
  • Put the Atmosphere Payload fusee-primary.bin into \bootloader\payloads

Optional: Have Hekate autoboot into Atmosphere


You can set up Hekate so that you do not have to navigate its menu, but boot into Atmosphere directly. To achieve this, do the following:

  • Boot up Hekate at least once, so that the file hekate_ipl.ini in the folder \bootloader is created
  • Open hekate_ipl.ini and append the following lines at the end:

Code:
[Atmosphere]
payload=bootloader/payloads/fusee-primary.bin
{ }
  • Change the value autoboot=0 to autoboot=1
  • This will make Hekate show a splashscreen for some seconds, and then autoboot into Atmosphere. During the splash screen, you can press one of the volume buttons to override the autoboot process and get into Hekate's menu.
  • Optional (if you want a longer time to be able to override): Change the value bootwait=3 to another time (in seconds)
  • Save the file

If you go into Hekate now, it will show a splashscreen for the time specified in bootwait and then boot Atmosphere.

With this done, there is now two ways to continue, depending on whether you want to move to Atmosphere completely without being able to boot SX OS anymore, or whether you want to dual-boot. Since the whole SX OS CFW is written into the boot.dat, and the SX Dongle does not allow anything but starting boot.dat, both options require slightly different setups.


Using the SX Pro or Gear Dongle to boot Atmosphere without the possibility to load SX OS

Utilizing the SX Gear boot.dat (which is just a chainloader), you can force the dongle to boot Hekate directly. As with the SX OS boot.dat, it will not launch Atmosphere directly and just blackscreen if you try to, and you'll also have to use Hekate to achieve getting into Atmosphere.

  • Follow all the steps above to set up Hekate
  • Get the SX Gear boot.dat, put that on the root of your microSD, overwriting any existing boot.dat
  • If you use the dongle to boot your console now, it will bring you into Hekate, where you can navigate to Launch > Payloads and choose fusee-primary.bin to launch Atmosphere


Using the SX Pro or Gear Dongle while being able to run both Atmosphere and SX OS

You cannot just use another boot.dat if you want to be able to run both Atmosphere and SX OS, because the boot.dat contains the whole SX OS CFW. So in that case,
  • Follow all the steps above to set up Hekate
  • Start your SX OS as usual
  • For SX OS, just launch the CFW as usual
  • For Atmosphere, go to Options > Payloads and launch payload.bin (this will bring you into Hekate)
  • Navigate to Launch > Payloads and choose fusee-primary.bin to launch Atmosphere


Where to buy Team Xecuter Modchip for Patched Switch and Switch Lite?

We all know that Team Xecuter has hacked the Mariko,  patched Switch, and the Switch Lite, and the modchip for patched and Mariko Switch wil...